Quick Start
Dive into the most straightforward and recommended way to use IRIS with Docker, detailed below.
Pre-requisites
Hardware
IRIS is designed to be lightweight yet scalable, running smoothly on small laptops or powering large organizations. For a typical instance of 20 users, daily usage of ~200 alerts, and a dozen ongoing cases:
- CPU : 4 cores
- RAM : 16 GB
- Storage : 1 TB fast SSD
Keep in mind that the database can grow rapidly, and modules may require more resources depending on their specific purposes. Database and so Storage Speed is often the bottleneck!
Docker
IRIS requires Docker and Docker Compose for building and running the project. For installation instructions visit the official Docker website.
The platform is officially supported on most Linux and MacOS systems. While it should work on Windows, some changes may be necessary to the dockerfiles for file storage paths.
Versioning
Production-ready code is always tagged with a specific version number. Alpha and beta versions are not production-ready, so please avoid using the master branch for live environments.
Run IRIS
Starting with v3, IRIS ships as three coordinated repositories:
iris-web(the meta / umbrella that ownsdocker-compose.yml, docs, and release orchestration),iris-backend(Python/Flask API + workers),iris-frontend(SvelteKit UI)
The latter two are wired into iris-web as git submodules. For a pull-only deployment you do not need to initialise submodules — docker compose up pulls pre-built images from ghcr.io/dfir-iris.
To run IRIS, follow these steps:
-
Clone the
iris-webrepository: -
Check out the latest tagged version:
Beta and production readiness
v3.0.0-beta.1 is the current v3 release. Beta versions are not production-ready — use them for evaluation, integration testing, and pre-migration rehearsals. Track the releases page for the first non-beta tag.
-
Copy the environment file and set the required secrets:
cp .env.example .env
# Edit .env — at minimum set POSTGRES_PASSWORD, POSTGRES_ADMIN_PASSWORD,
# IRIS_SECRET_KEY, IRIS_SECURITY_PASSWORD_SALT, and IRIS_HOSTNAME.
Warning
The default configuration is suitable for testing only. To configure IRIS for production, see the configuration section.
-
Provide a TLS certificate at
certificates/web_certificates/:v3's nginx expects
iris_dev_cert.pemandiris_dev_key.pem(or whateverCERT_FILENAME/KEY_FILENAMEin.envpoint at) before it will start. For a quick self-signed pair suitable for local testing:mkdir -p certificates/web_certificates openssl req -x509 -newkey rsa:2048 -sha256 -days 365 -nodes \ -keyout certificates/web_certificates/iris_dev_key.pem \ -out certificates/web_certificates/iris_dev_cert.pem \ -subj "/CN=iris.local" \ -addext "subjectAltName=DNS:localhost,IP:127.0.0.1" chmod 600 certificates/web_certificates/iris_dev_key.pemFor Let's Encrypt / certbot setups, unset both
CERT_FILENAMEandKEY_FILENAMEin.env; nginx will autodetectfullchain.pem+privkey.pemif they exist in the same directory. See the configuration reference for details. -
Pull the Docker containers:
-
Start IRIS:
IRIS should now be accessible on your host interface via HTTPS protocol, port 443 by default. You can access it through your web browser using https://hostip.
Upon first start, an administrator account will be created. The password is printed in the console output and can be found by searching for WARNING :: post_init :: create_safe_admin in the logs. Alternatively, you can define an admin password at the first start using the IRIS_ADM_PASSWORD environment variable in the .env. Please note that this setting has no effect once the administrator account is created.
Info
If you don't find the password in the logs, try running docker compose logs app | grep "WARNING :: post_init :: create_safe_admin". If the logs indicate that user administrator is already created, it means the instance already started once and the password has already been set. Check the recovery options.
IRIS should now be available on the host interface, port 443, using HTTPS protocol by default. You can access it by navigating to https://hostip in your web browser.
Additional configuration 🛠️
Please see configuration for more details.
Building from source
If you would rather build the images locally instead of pulling from ghcr.io:
git clone --recursive https://github.com/dfir-iris/iris-web.git
cd iris-web
git checkout v3.0.0-beta.1
./scripts/dev-up.sh
scripts/dev-up.sh composes docker-compose.yml with docker-compose.build.yml (which points build contexts at the iris-backend/ and iris-frontend/ submodules) and passes --build to compose. It also mints a self-signed dev cert on first run so nginx can start without operator setup.
Kubernetes
Enterprises wishing to run their IRIS instance on their preferred managed Kubernetes platform can utilize the official Helm charts and/or Kustomize manifests for enhanced deployment and management, ensuring high availability and seamless scaling as demand fluctuates.
The deploy directory in the iris-backend submodule provides a starting point for deploying IRIS using EKS or GKE. Customize each variant with your values for a smooth deployment experience.
For more details, please visit the deploy directory on GitHub.
Components 📦
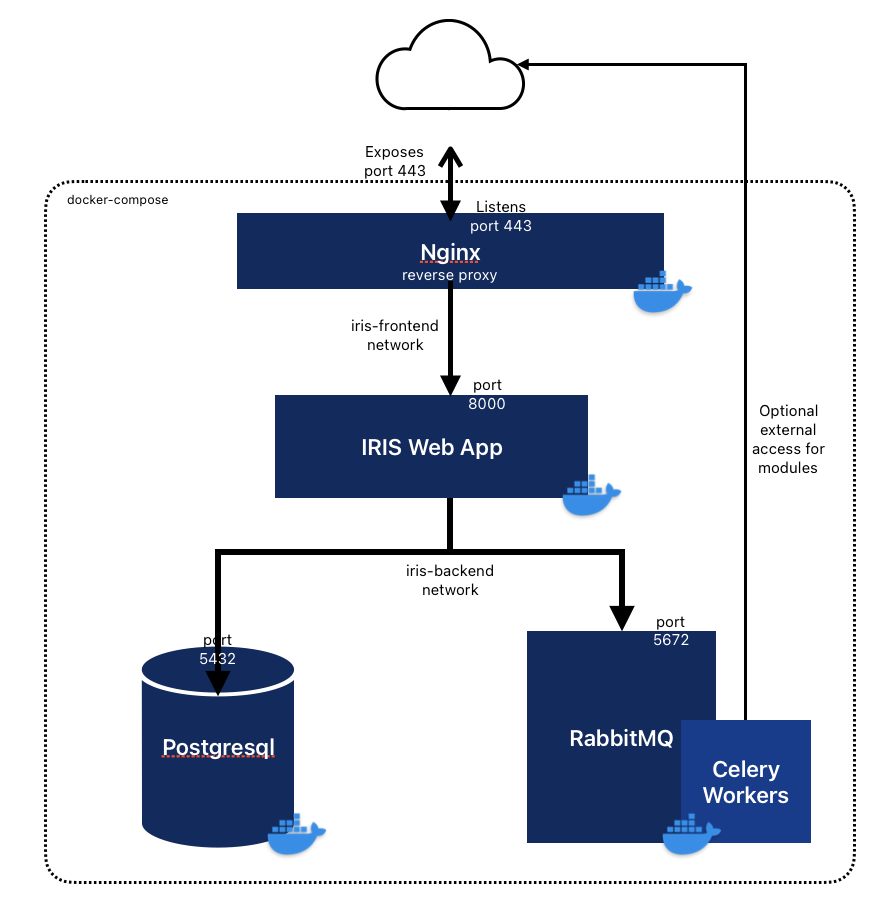
Note that IRIS v3 runs six Docker services, each with a different role:
app— Flask API + backend web server (image:iris-backend)worker— Celery job handler (image:iris-backend)frontend— SvelteKit SSR server for the web UI (image:iris-frontend)db— PostgreSQL 18 (image:iris-db)rabbitmq— broker used by Celery for job queuingnginx— TLS termination + reverse proxy (image:iris-nginx); routes/api/*toappand everything else tofrontend
All images are pinned together by the IRIS_VERSION variable in .env, so a single knob rolls the whole stack.